Let me paint the picture for you:
We have a two-car garage that is currently functioning as a storage space and workshop space as well as a home for The Gearhead’s motorcycle. We have a short two-car driveway. We live in a duplex townhome community. Hence we have a home owner’s association that has a lot of rules. Rules like “thou shall not park your car on the street for more than seven days at a time” and “thou shall not make a lot of noise” etc, etc, etc.
Not the makings for the best case car restoration project scenario. For all the lists and plans that we have made before and during this month, one thing we did not take into account is the work space. Well, I take that back some…we knew it was small and not ideal, but we really didn’t have any other choice so we worked with what we had. But I think we could have taken a more methodical approach not only to where we worked, but how we worked as well.
My advice to Gearhead’s with confined working spaces is this:
1. Try to remove everything that isn’t related to the car project. Is there any place else you can store the boxes of holiday stuff and camping gear? Some options would be to rent a storage unit for a while; the cost may well be worth it. Or even moving some of that seasonal stuff into an unused spare bedroom? You can shut the door and just forget about it till the project is done. This is bit of a pain in the beginning, but so worth the extra room during the project!
2. Pare down the tool selection. If you have a tool collection anything like The Gearhead, you don’t need them all for this job, so it may be worth the extra room to just box up the tools that you won’t use and put them in that unused bedroom with the rest of the rejects.
3. Set up the tools that you will use. Hang them on the wall so you can to make use of your vertical space.
4. Remember to return the tools to their spot on the wall at the end of the night. The Gearhead argues with me on this one, so let me clarify a bit. I'm not talking about the wrenches and sockets and stuff that you are using all the time. It's just as handy to have them right on the floor next to whatever you are going to do next. But the stuff that isn't used often...just get it out of your way.
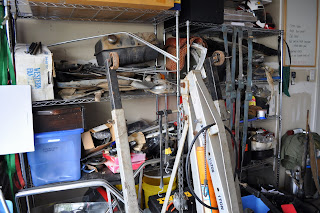
5. Have a designated space for the stuff that comes out of the car. Seatbelts, mirrors, dash pads, headlights…there’s so many little things. We set up two steel shelving racks on one side of the garage to house all this stuff. Again, makes use of the vertical space and clears the floor. It still looks like a mess, but at least it’s all together in one spot and you don’t have to worry about tripping over anything.
6. Moved finished pretty parts to a clean room. When we upholstered the door panels, there was no way I was going to let them live in the greasy, dirty garage while the rest of the car got overhauled. The dust alone would have killed all our hard work. So they currently live in that unused spare bedroom, safe and sound. If you must leave them in the garage, cover them with a tarp or blanket.
And take this advice for what it’s worth. We certainly don’t have all the answers! Ultimately, you need to find the working style that fits you. But I think these suggestions can only help in the long run. Do you have any tips to share?

No comments:
Post a Comment